>>
30-MINUTE MEALS! Get the email series now →


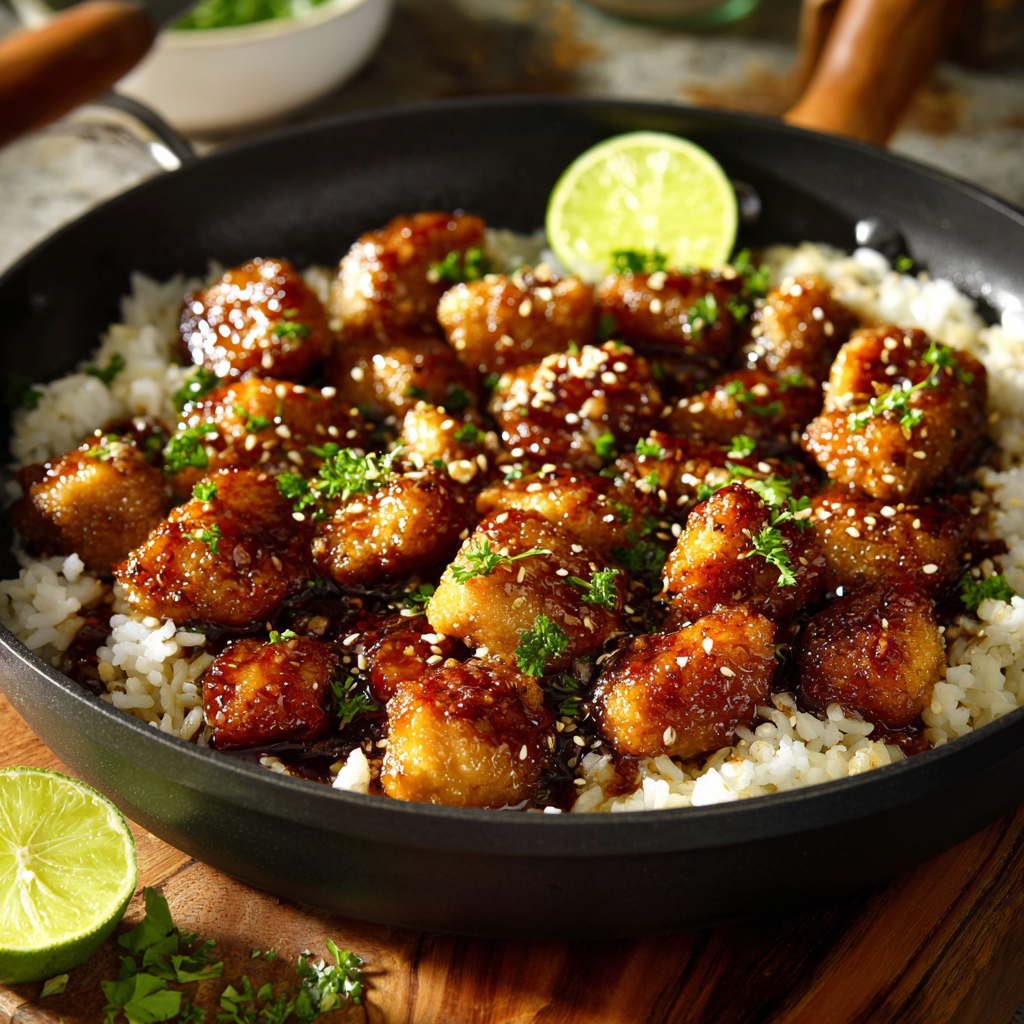
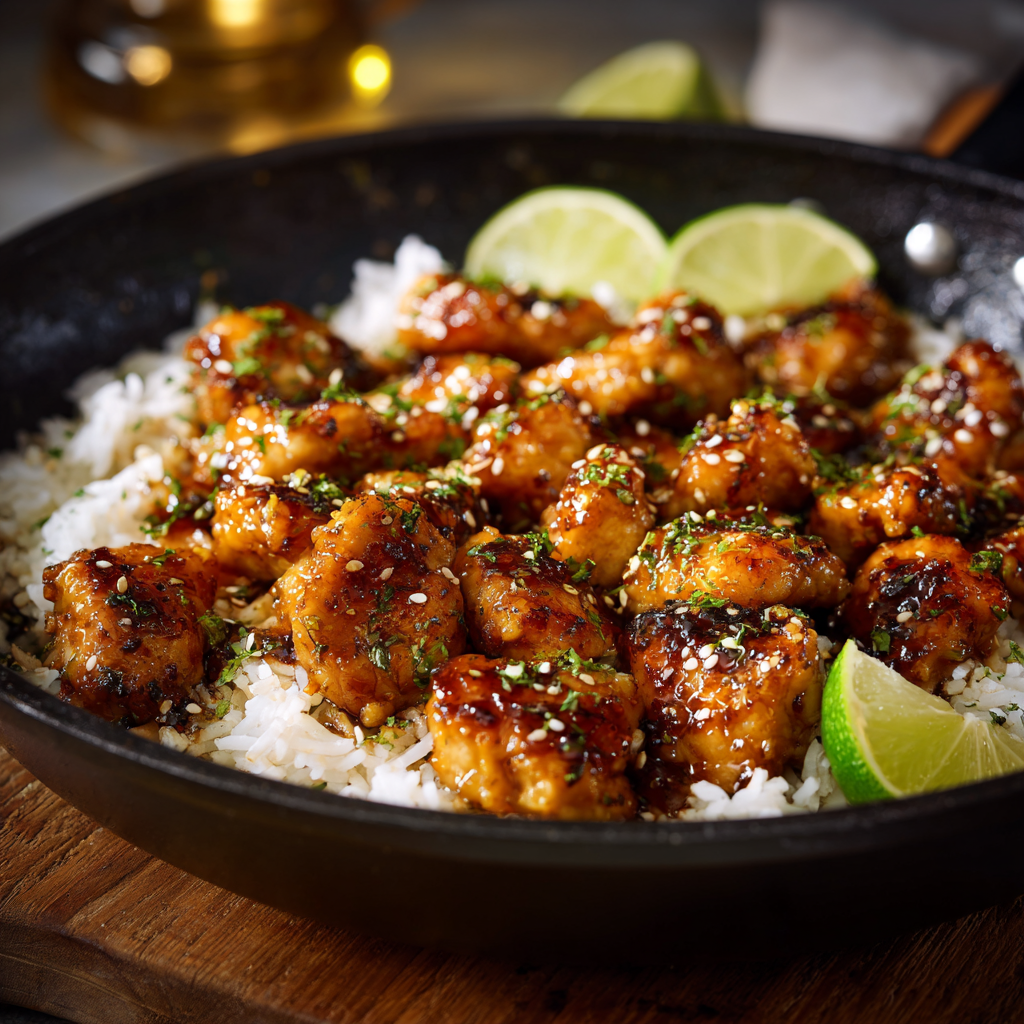
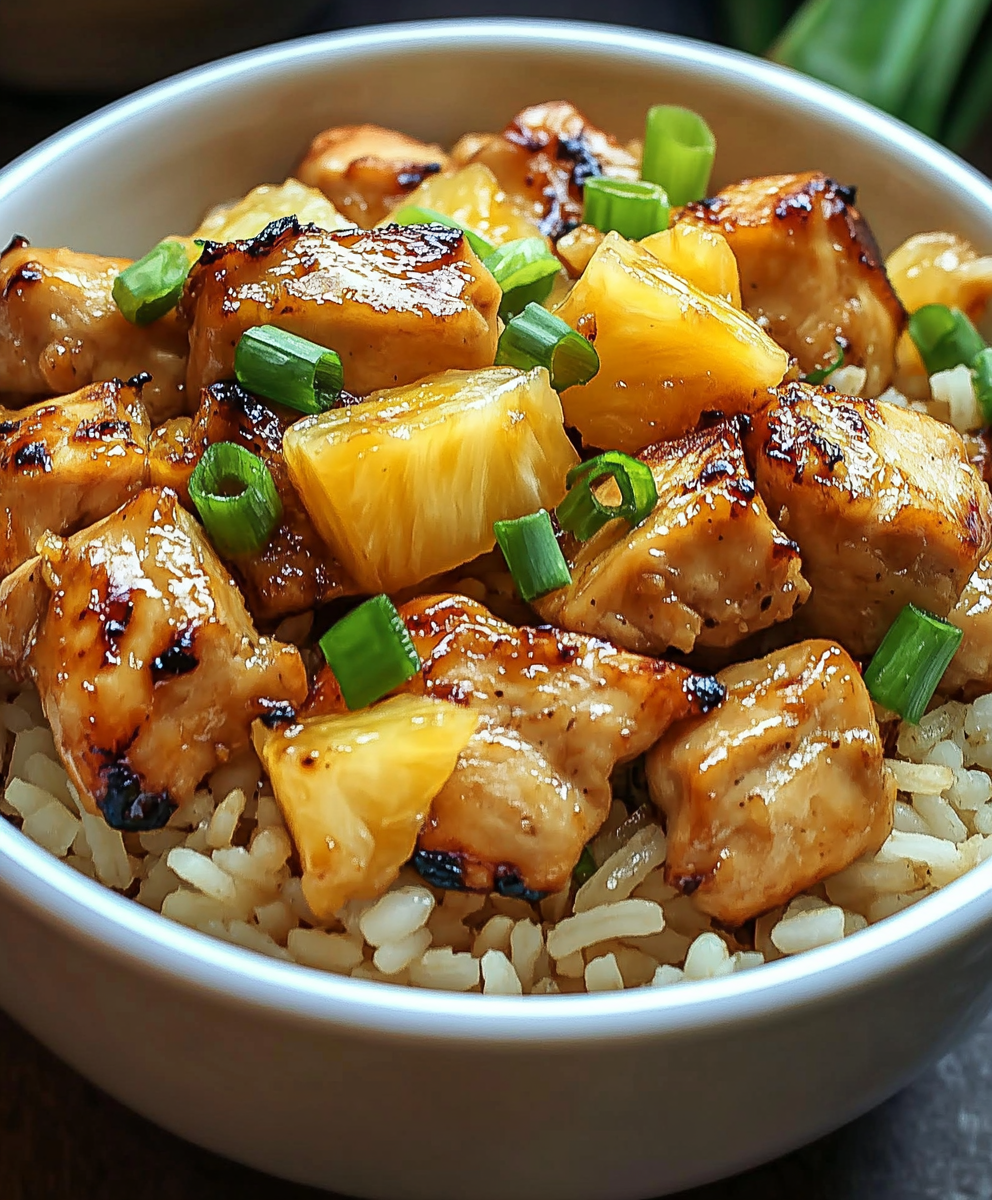
Sticky, tender boneless chicken thighs glazed in a sweet and savory honey-garlic sauce — ready in 20 minutes and perfect over steamed rice.
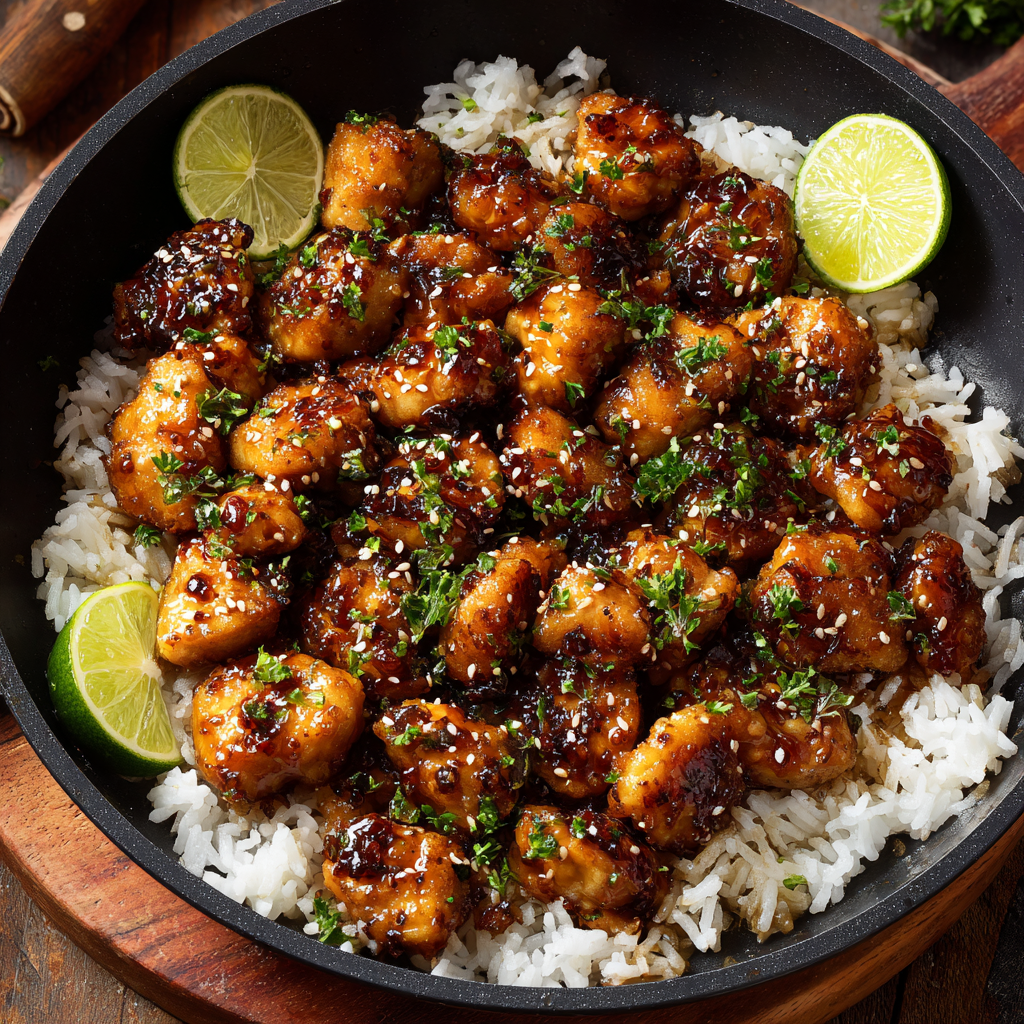
This sticky honey garlic chicken has been a weeknight lifesaver in my kitchen ever since I first scribbled the recipe on the back of a shopping list. I discovered this glaze one busy evening when I had a craving for something sweet, garlicky and satisfying but only a handful of pantry staples on hand. The result was a glossy, caramelized coating clinging to juicy boneless thighs — the kind of plate that clears itself in seconds and leaves everyone asking for the recipe.
What I love most about this dish is the contrast: a lacquered, slightly crisp exterior and the soft, yielding interior that thighs give you. The honey provides shine and a touch of deep caramelized sweetness, the garlic cuts through with aromatic heat, and a splash of rice vinegar brings a bright counterpoint so the sauce never feels cloying. I often make it when friends drop by unexpectedly because it comes together quickly and looks like something I fussed over for hours.
I first served this at a Sunday supper and watched the room go quiet while everyone forked for seconds. My partner said it tasted like takeout but better, and I liked that — a homemade, cleaner flavor profile with the familiarity of Chinese-inspired sauces. Over time I’ve learned small tweaks: pat the thighs dry, don’t overcrowd the pan, and let the sauce reduce until it clings to the meat for that perfect sticky finish.
The best part of serving this dish has been watching skeptics — those who say they prefer plain grilled chicken — come back for thirds. The glaze has a way of making familiar ingredients taste elevated and special, and I love how a simple pantry lineup can produce such an impressive, restaurant-style finish. I’ve learnt to trust the technique: a hot pan, a light dusting of cornstarch, and patience while the sauce reduces are the three steps that yield consistent results.
Store leftovers in an airtight container in the refrigerator for up to 4 days. To freeze, cool the cooked chicken quickly by spreading pieces on a tray, cover and freeze until firm, then transfer to a freezer-safe bag for up to 3 months. When reheating from frozen, thaw overnight in the fridge, then reheat in a preheated oven at 350°F (180°C) on a baking tray covered with foil for 12–15 minutes. For best texture, avoid reheating in the microwave which can make the glaze gummy; instead refresh briefly in a skillet over medium heat with a splash of stock if needed.
If you don’t have rice vinegar, use apple cider vinegar or white wine vinegar with a pinch of sugar to mimic the sweetness of rice vinegar. Replace light soy sauce with tamari for a gluten-free option, or use 3/4 tablespoon dark soy in a pinch (it’s saltier and darker, so expect a deeper color). If you prefer white meat, use boneless chicken breasts sliced into 3/4-inch strips and reduce the searing time to prevent drying; pound them to an even thickness if needed so they cook quickly and evenly.
Serve this over steamed jasmine or basmati rice with a side of quick-blanched greens such as bok choy, tenderstem broccoli or green beans to cut through the sweetness. Garnish with chopped parsley or cilantro, toasted sesame seeds, and extra chili flakes for heat. For a heartier meal, spoon the chicken over fried rice or serve alongside simple noodles tossed with a drizzle of sesame oil and scallions.
While not a strict traditional dish, this recipe draws on Chinese-inspired flavors — soy, rice vinegar and garlic — that are common in many East Asian sauces. Sweet and savory glazes are popular across the region, often used to coat meats for a shiny finish, whether in Cantonese-style preparations or home-cooked stir-fries. The technique of reducing a sauce to a glossy glaze is a hallmark of many classic preparations and helps concentrate flavors while producing an appealing texture.
In spring and summer, pair the chicken with lightly dressed cucumber salad or a mango slaw for freshness and acidity. In autumn and winter, serve it with roasted root vegetables and a sticky rice pilaf to make the meal feel warming and substantial. For holiday gatherings, double the batch and arrange pieces on a platter garnished with sesame seeds and scallions so guests can help themselves.
Cook a double batch and portion into microwave-safe or oven-safe containers for grab-and-go dinners. Cook the rice separately and store it flat in shallow containers so it reheats evenly. If you plan to reheat multiple portions, keep the glaze slightly looser (a touch more stock) when cooking; it will thicken upon cooling and reheat smoothly without becoming overly sticky or crystalline.
This honey garlic chicken is one of those dishes that fits comfortably into both weeknight rotation and small dinner parties. It’s reliable, fast and forgiving — the kind of cooking that builds confidence because technique matters more than fancy ingredients. Try it once, and it will likely become a trusted option when time is short but you still want something delicious on the table.
Pat the chicken dry before coating with cornstarch to ensure a crisp, golden sear.
Do not overcrowd the pan; sear in batches so pieces brown instead of steaming.
Bring the sauce to a gentle simmer and reduce until it clings to the chicken for the best sticky glaze.
Use a meat thermometer to confirm an internal temperature of 165°F (74°C) to ensure doneness without overcooking.
This nourishing honey garlic chicken recipe is sure to be a staple in your kitchen. Enjoy every moist, high protein slice — it is perfect for breakfast or as a wholesome snack any time.
Yes. You can use chicken breast if you slice it into thick strips or flatten thinly so it cooks quickly and doesn't dry out. Reduce the sear time accordingly.
Yes. Replace soy sauce with tamari, use gluten-free stock and ensure your rice vinegar brand is gluten-free.
This Honey Garlic Chicken recipe makes perfectly juicy, tender, and flavorful steak every time! Serve with potatoes and a side salad for an unforgettable dinner in under 30 minutes.
Pat thighs completely dry. Toss with cornstarch, salt and pepper in a large bowl until evenly coated. Drying helps create a light crust which promotes better browning.
Heat a large skillet over high heat until shimmering. Add vegetable oil and wait for a lively sizzle before adding the chicken; this ensures immediate searing.
Place thighs in a single layer and sear for 4–5 minutes on the first side without moving them to develop a golden crust. Flip and sear the other side for 2 minutes.
Reduce heat to medium, add butter and once melted stir in minced garlic. Cook 30–45 seconds until fragrant, taking care not to burn the garlic.
Whisk honey, chicken stock, rice vinegar and light soy sauce together. Pour into the pan, bring to a boil, then simmer 4–5 minutes until the sauce reduces and thickens into a glaze.
When the glaze clings to the chicken and pieces reach 165°F (74°C), remove from heat. Sprinkle with parsley and chili flakes and serve over steamed rice. Rest 2–3 minutes before serving.
Last Step: Please leave a rating and comment letting us know how you liked this recipe! This helps our business to thrive and continue providing free, high-quality recipes for you.
Leave a comment & rating below or tag
@kitchenfunwithmy3sons on social media!

Buttery pastry envelopes a sweet, creamy cinnamon filling for an irresistible warm dessert or snack—ready in just 30 minutes.
A bright, one-skillet meal that pairs sweet pineapple with savory chicken and fluffy jasmine rice for an easy, dairy-free weeknight dinner.

Warm tortilla filled with creamy sweetened cream cheese, fresh blueberries and a drizzle of honey—an easy, satisfying morning treat ready in minutes.
Leave a comment & rating below or tag @kitchenfunwithmysons on social media!
Enjoyed this recipe? Share it with friends and family, and don't forget to leave a review!
This recipe looks amazing! Can't wait to try it.
Comments are stored locally in your browser. Server comments are displayed alongside your local comments.
Quick and easy dinner ideas delivered to your inbox.