>>
30-MINUTE MEALS! Get the email series now →


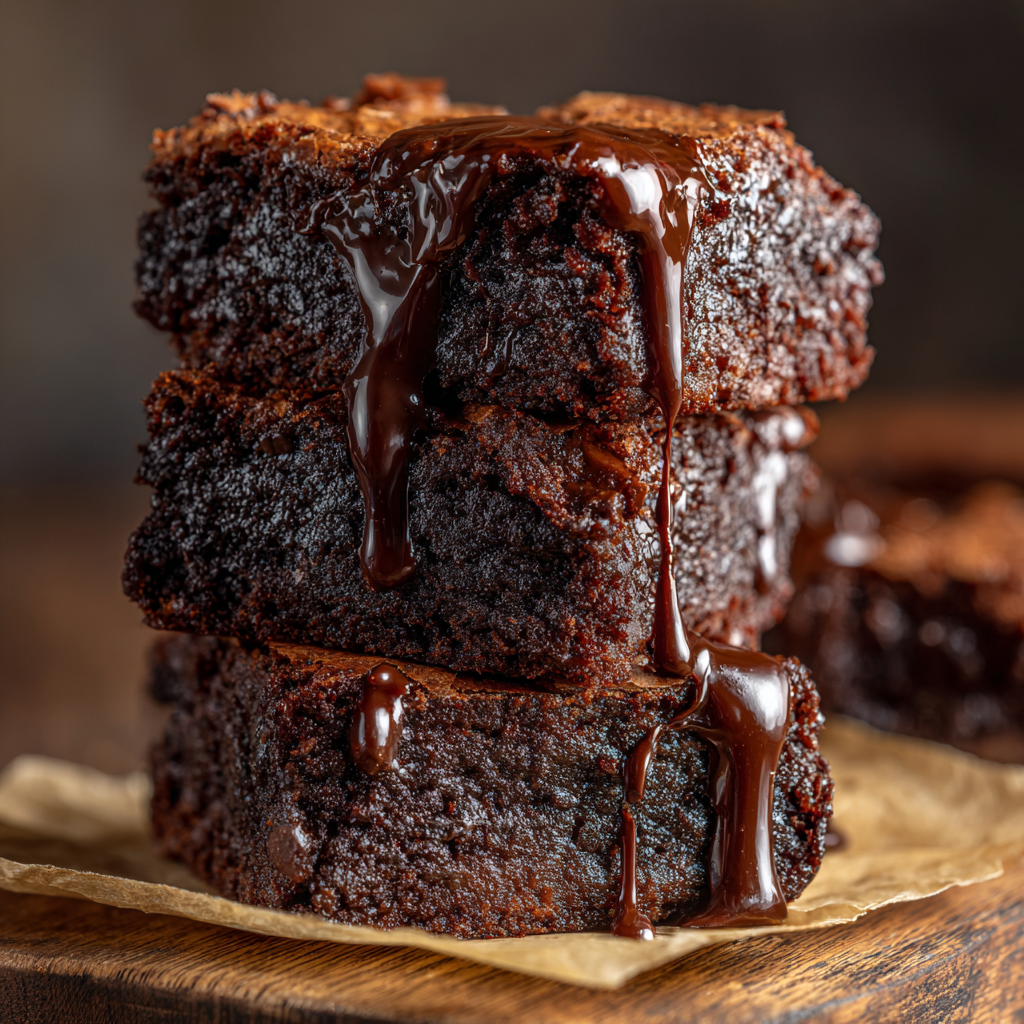
A luscious hybrid of fudgy chocolate brownies and chewy mochi cake — dense, slightly chewy, and impossibly satisfying. Makes 12 tidy squares.

I remember my aunt, who is usually reserved about new desserts, closing her eyes after the first bite and asking for the recipe. These squares have sparked conversations at many gatherings, and I love that the recipe is forgiving — small swaps still give you a successful, delicious result. The balance of chew and fudginess makes these memorable without being overly sweet.
My favorite aspect is how reliably these squares please both adventurous eaters and traditionalists. The first time I left a pan out for guests at a family gathering, discarded plates returned with only crumbs — a sure sign it succeeded. I also learned to time the bake precisely: an extra five minutes can firm the center just right without compromising chew.
Store cooled squares in a single layer in an airtight container at room temperature for up to 2 to 3 days. If stacking, place parchment between layers to prevent sticking. For longer preservation, freeze individually wrapped pieces in plastic wrap and transfer to a freezer-safe bag; they keep well for up to three months. To thaw, move squares to the refrigerator overnight or leave at room temperature for 30 to 60 minutes. Reheat gently in a low oven (300°F for 6-8 minutes) if you prefer them slightly warm; avoid microwaving for long periods or they will become gummy.
If you need dairy-free options, replace the 12 ounces of whole milk with an equal volume of full-fat coconut milk or unsweetened oat milk and swap the 5 tablespoons butter for refined coconut oil or a neutral vegetable oil. For a less sweet finish reduce sugar to 3/4 cup. If you want more chocolate intensity, stir 1/4 cup chocolate chips into the batter in addition to the chopped chocolate on top. For gluten-sensitive cooks, double-check that baking powder and cocoa are certified gluten-free, though mochiko itself is naturally gluten-free.
Serve squares as-is with a dusting of powdered sugar or a light sprinkle of flaky sea salt to highlight the chocolate. For an elegant dessert, top a warm square with a scoop of vanilla ice cream and a drizzle of warm chocolate sauce. These also pair well with lightly whipped cream and fresh berries to balance their density. For a casual coffee break, cut smaller bite-sized pieces and arrange on a sharing platter with nuts and dried fruit.

The chewy texture comes from mochiko, a sweet rice flour long used in Japanese confections such as mochi and wagashi. This recipe blends that traditional chew with Western-style chocolate baking to create a hybrid dessert popular in fusion bakeries. Over the years, bakers in the United States have embraced sweet rice flour for gluten-free and texturally unique treats, and these squares are a modern example of cross-cultural adaptation — honoring the springy textural tradition while highlighting familiar cocoa flavors.
In colder months, fold in 1/2 teaspoon cinnamon or a pinch of ground ginger for warming spice. For spring, replace half the chopped dark chocolate with white chocolate and stir in 1 tablespoon lemon zest for brightness. During the holidays add 1/4 cup chopped toasted pecans and a sprinkle of orange zest on top before baking. These small swaps let you tailor the flavor profile without changing the method or bake time significantly.
Prepare the batter the evening before and refrigerate covered for up to 24 hours; allow to come to room temperature before baking, and add a minute or two to the bake time if chilled. Bake a full tray, cool thoroughly, then portion into single-serve packs for lunches or snacks. Use parchment-lined boxes to keep pieces neat. Freezing individual portions is especially helpful for gifting or quick desserts during a busy week.
At its heart, this recipe is about approachable experimentation. The technique is simple, and the result always feels a little special. I hope you enjoy sharing these chewy, chocolatey squares as much as I do — they make everyday moments feel celebratory.
Allow the pan to cool fully before slicing so pieces release cleanly and are not gummy.
Use room-temperature eggs and slightly cooled melted butter so the wet mixture emulsifies evenly.
Check doneness with a toothpick at 60 minutes; look for mostly clean with a few moist crumbs.
Line the 8x8 pan with parchment leaving an overhang for easy removal and neat slicing.
This nourishing mochi brownies recipe is sure to be a staple in your kitchen. Enjoy every moist, high protein slice — it is perfect for breakfast or as a wholesome snack any time.
Let the pan cool completely before slicing; warm mochi will be sticky and not slice cleanly.
Store at room temperature in an airtight container for 2-3 days or freeze up to 3 months.
This Mochi Brownies recipe makes perfectly juicy, tender, and flavorful steak every time! Serve with potatoes and a side salad for an unforgettable dinner in under 30 minutes.
Preheat oven to 350°F. Line an 8x8-inch baking pan with parchment paper, leaving an overhang to lift the cooled brownies out easily.
In a medium bowl, whisk together mochiko, cocoa powder, granulated sugar, and baking powder until evenly mixed and free of lumps.
In a large bowl, whisk melted butter with eggs, milk, and vanilla until smooth and no streaks of egg remain. Using room-temperature eggs helps the mixture emulsify evenly.
Pour dry mixture into the wet bowl and fold gently until combined. The batter will be looser than traditional brownie batter; mix until there are no dry pockets but avoid overmixing.
Pour batter into prepared pan, smooth the top, and sprinkle chopped dark chocolate evenly over the surface so it melts into glossy pockets while baking.
Bake for 60 to 70 minutes at 350°F. A toothpick inserted into the center should come out mostly clean with a few moist crumbs. Cool completely on a wire rack before slicing.
Last Step: Please leave a rating and comment letting us know how you liked this recipe! This helps our business to thrive and continue providing free, high-quality recipes for you.
Leave a comment & rating below or tag
@kitchenfunwithmy3sons on social media!
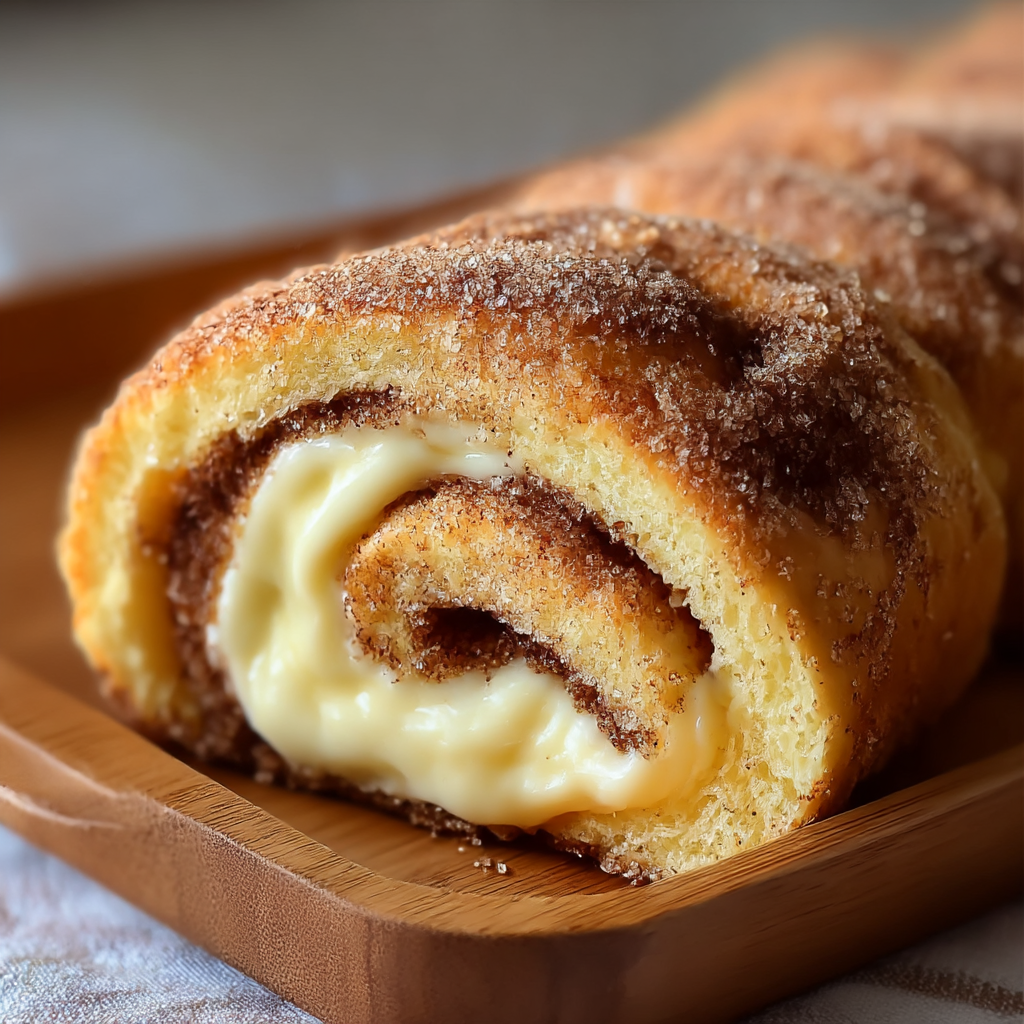
Buttery pastry envelopes a sweet, creamy cinnamon filling for an irresistible warm dessert or snack—ready in just 30 minutes.

A bright, one-skillet meal that pairs sweet pineapple with savory chicken and fluffy jasmine rice for an easy, dairy-free weeknight dinner.
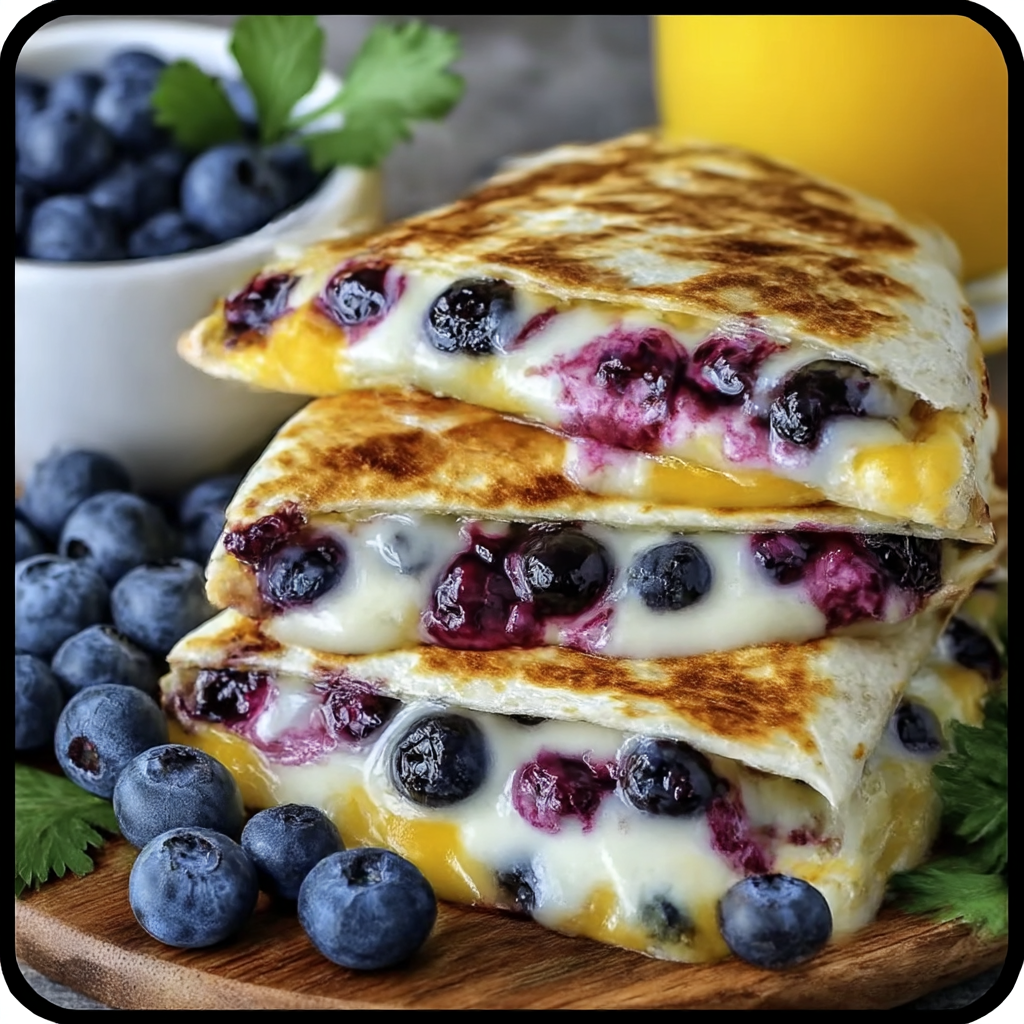
Warm tortilla filled with creamy sweetened cream cheese, fresh blueberries and a drizzle of honey—an easy, satisfying morning treat ready in minutes.
Leave a comment & rating below or tag @kitchenfunwithmysons on social media!
Enjoyed this recipe? Share it with friends and family, and don't forget to leave a review!
This recipe looks amazing! Can't wait to try it.
Comments are stored locally in your browser. Server comments are displayed alongside your local comments.
Quick and easy dinner ideas delivered to your inbox.